When seed pots are in short supply, inventive amateur gardeners have long since turned to a completely different household item - with a surprisingly good result.
Anyone who has bought seed in a burst of spring enthusiasm soon discovers that there are never enough pots. That is exactly where a smart method comes in, one that has quietly been spreading through many gardens. It uses a plain household material, saves space, money and plastic, and still produces sturdy young plants.
The idea behind the snail seed roll
To raise seedlings successfully, gardeners really need three things: a moist growing medium, steady warmth and plenty of light. Traditionally, that means small pots or multi-cell trays. The drawback is obvious: they fill shelves and windowsills at remarkable speed, and buying fresh containers every year creates avoidable waste.
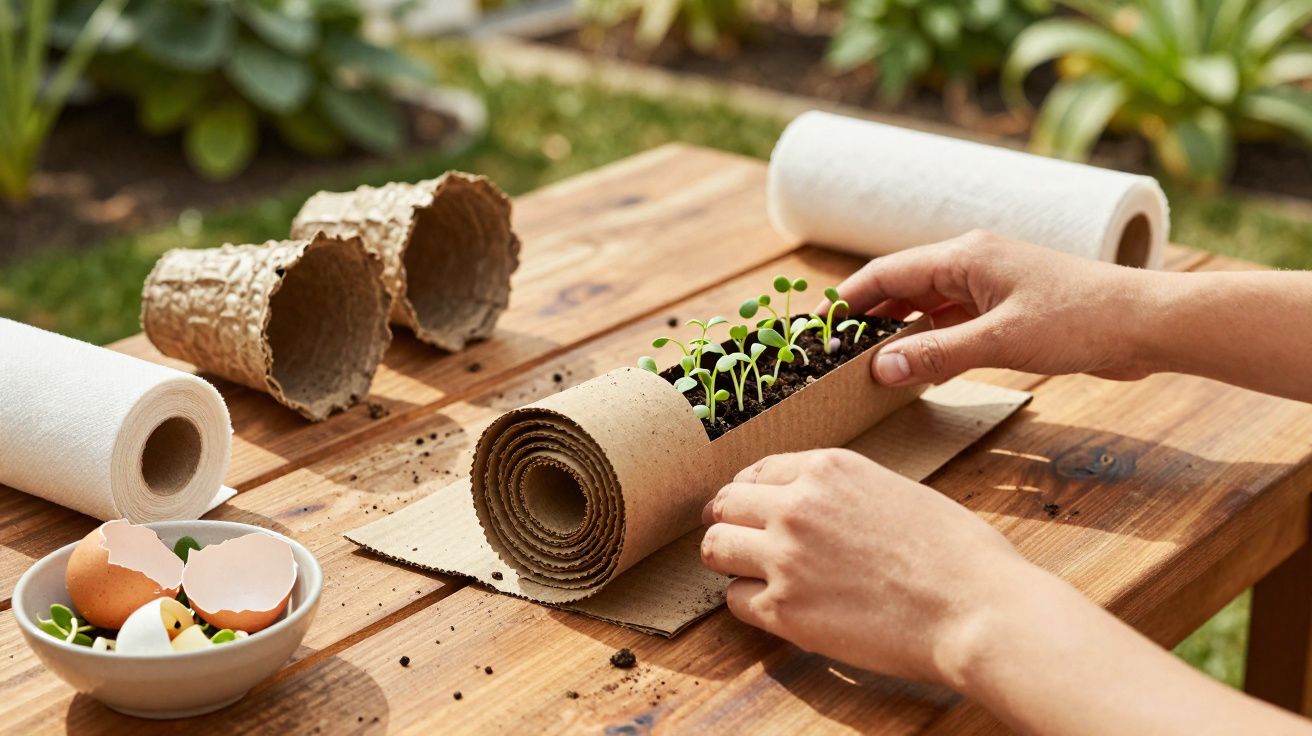
The snail method replaces entire trays of pots with a single, space-saving rolled strip for sowing.
The principle is simple. A flexible strip made from recycled material is lined with kitchen paper or fabric, covered with damp seed compost, seeded, and then rolled up firmly. From above, the shape looks like a snail shell, which is how the method got its name. The roll is placed in a shallow dish with a little water, and the mini greenhouse is ready.
Why more and more gardeners are using the snail method
At first glance, the technique can seem like a crafty online trick. Once you try it, though, the practical benefits become clear.
- Saves space: One roll can stand in for an entire line-up of plastic pots on a windowsill.
- Cuts waste: Old freezer bags, carrier bags or newspaper get a second life.
- Makes pricking out easier: Because the seedlings sit neatly side by side in the roll, their roots are easier to access.
- Helps regulate moisture: Kitchen paper and compost hold water evenly, removing the risk of waterlogging in separate pots.
- Saves money: There is no need to buy extra trays, pots or expensive compressed peat pots.
It is especially popular with balcony and urban gardeners who need every centimetre of shelf space they can get. A single dish can be used to germinate hundreds of seeds, from lettuce to tomatoes.
Which everyday item replaces the pots?
The key ingredient is something found in almost every home: thin plastic or paper from daily life. Common examples include:
- cut-open freezer bags
- old, clean carrier bags made from thin plastic
- wide strips of newspaper
- leftovers from decorator’s film or clear covering film
These form the flexible base that can later be rolled up. A layer of kitchen paper or a thin cloth goes on top to hold moisture, and only then does the seed compost follow.
Instead of buying expensive propagation trays, all you really need for the snail roll is an old freezer bag, some kitchen paper and a little compost.
How to make your own seed snail, step by step
1. Prepare the materials
For one roll, the basic kit looks like this:
- a long strip of plastic bag or newspaper, 10–15 cm wide
- a layer of kitchen paper or a thin strip of fabric in the same size
- fine seed compost, lightly moistened
- seeds, for example lettuce, kohlrabi, tomatoes, peppers or flowers
- a shallow dish, saucer or deep plate
The base should lie as flat as possible so that everything can later be rolled tightly and evenly.
2. Build up the layers
First, place the plastic or paper strip on the table. Lay the kitchen paper or fabric on top. This layer keeps moisture close to the roots later on.
Next, spread on a thin layer of damp seed compost. It should be moist, not dripping wet - more like a sponge that has been squeezed out well. Do not make the layer too thick, or rolling it up becomes awkward.
3. Sow the seeds and leave the right spacing
Place the seeds in a line along the upper edge of the compost strip. A few centimetres between each seed is enough, so that the seedlings do not immediately compete for room.
This method works best with fine seed. Larger seeds such as beans or peas are more likely to slip out and are usually better suited to conventional pots.
4. Roll it into a compact snail
Now comes the crucial part: slowly roll the strip up from one end. Try to keep the compost in place as you work. A roll that is firm but not too tight allows water to spread evenly later on.
Stand the finished roll upright in a dish. From above, you will see the rounded layers of the compost strip, a bit like the layers of a cinnamon bun.
5. Water properly and choose the right spot
Pour a little water into the dish, just enough for the lower edge of the roll to sit lightly in it. The compost will draw up moisture like a sponge.
A bright spot is ideal, but not one that gets too hot - a windowsill with morning or evening sun works well. Strong direct midday sun can scorch tender seedlings.
If you are making several rolls, it is worth attaching a small waterproof label with the variety name and sowing date. That way, you can keep track of which seedlings are which without having to guess later on.
Care: how to keep the seedlings strong
In the first few days, nothing much seems to happen. Beneath the surface, however, the seeds are already working hard.
- Keep an eye on moisture: The roll must never dry out, but it should not sit in deep water either.
- Give light from the start: As soon as the first shoots appear, the plants need plenty of brightness so they do not become leggy.
- Encourage air movement: A window opened slightly or a small fan helps prevent mould.
Checking the compost regularly with a finger to see whether it is still lightly damp helps prevent both drought stress and rotting roots.
When to unroll the snail again
Depending on the plant, the first true leaves usually appear after two to three weeks. By then, it is time to open the roll little by little.
The easiest way is to lay the seed strip flat on the table and unfold it gradually. The young plants will sit neatly beside one another in the compost strip. A spoon handle or pricking-out stick makes it easy to lift them out together with a bit of the surrounding compost.
Each seedling can then go into its own pot, or, if the weather is suitable, straight out into the bed. In the first few days after moving, the plants appreciate even moisture and some shelter from strong sun or wind.
Once they have settled in, it helps to harden them off gradually if they are heading outdoors. A few short spells outside before planting out reduces shock and gives the seedlings time to adjust to cooler air and stronger light.
Which crops suit the method best?
Not every plant enjoys this sort of early propagation equally. It works particularly well for:
| Plant | Suitable for the snail method? | Note |
|---|---|---|
| Lettuce | very good | fine seed, lots of plants in a small space |
| Kohlrabi, white cabbage and similar crops | very good | sturdy seedlings that are easy to prick out |
| Tomatoes, peppers, chillies | good | need lots of light, ideal for bright windowsills |
| Flowers such as marigolds and zinnias | good | perfect for colourful balcony boxes |
| Peas, beans | limited | larger seeds are more likely to slip, so pots are usually better |
Common mistakes and how to avoid them
Especially on the first attempt, things rarely go perfectly. Three issues tend to cause trouble in practice:
- Too wet: The seeds rot before they germinate. Solution: only dampen the compost lightly and top up the water in the dish sparingly.
- Too little light: The seedlings stretch and collapse. Fix: move them to a brighter position or use a grow light if needed.
- Too tight a roll: The roots have very little room. Better: roll it a little more loosely so air can reach the compost.
Once you know these pitfalls, the method is easy to master. Many gardeners say that the second or third snail already germinates much more evenly.
Why the effort is genuinely worthwhile
This method fits perfectly with a time when many people want to handle resources more thoughtfully. Instead of buying new plastic trays, you can simply reach into a drawer for old bags or paper.
At the same time, the snail roll offers a useful bonus: you can see very clearly when each seed has sprouted, how the roots are developing and how strongly the plants respond to more light or water. That makes it excellent for beginners and children who want to understand how growth works.
If you enjoy the technique, you can expand it further: for example, place several narrow rolls with different varieties in one large dish, or test mixed sowings - perhaps lettuce and flowers growing side by side before going out into the bed together. In that way, a simple household item becomes a surprisingly clever tool for sustainable propagation.
Comments
No comments yet. Be the first to comment!
Leave a Comment