Plenty of homeowners know the situation: the tiles are structurally fine, but visually they’re stuck somewhere in the 1990s. If you don’t want days of disruption, you need an option that looks current, stands up to everyday life and doesn’t involve swinging a sledgehammer. That’s where a type of flooring long established in professional settings comes in - and it’s now becoming increasingly popular in private homes too.
Why a new floor without demolition suddenly becomes realistic
Replacing tiles the traditional way is a serious undertaking. The existing finish has to go, tiles are chipped off, rubble is carted away, the subfloor is rebuilt, and only then can the new surface be installed. In practice, that means dust everywhere, drilling noise, furniture piled up, rooms out of action - and costs that can quickly spiral.
People who’ve just taken on a flat often face the same choice: put up with a floor you dislike, or commit to a major building job. This is exactly where the approach of upgrading what’s already there, rather than tearing it out, starts to make a lot of sense.
"A solid but dated tiled floor no longer has to be removed - it can be covered seamlessly and completely transformed visually."
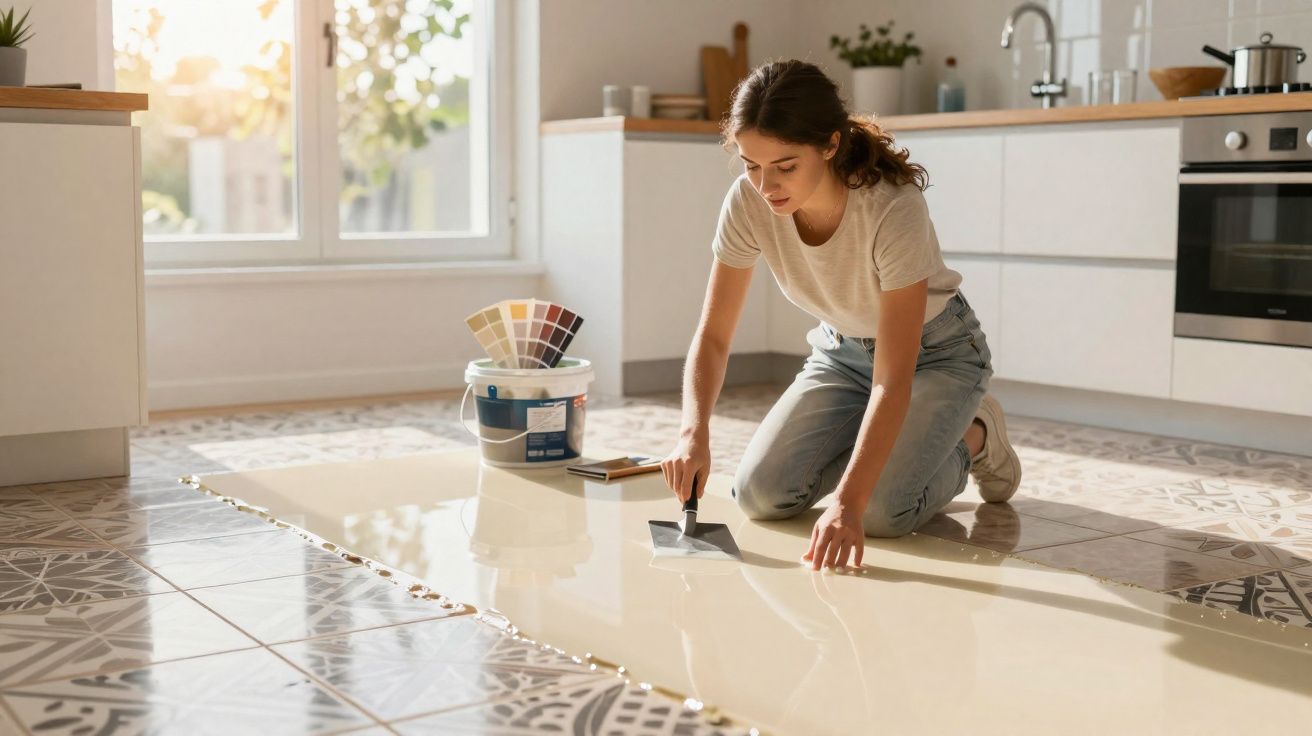
The idea is straightforward: the existing tiles receive a continuous overlay that hides the grout lines, creates a smooth surface and can make the space feel larger. No more grout channels that collect grime, and a finish that’s closer to a modern loft floor than a traditional, old-fashioned kitchen.
Resin floor instead of tiles: how the overlay works
The method comes from industrial sites and public buildings: decorative resin systems, typically based on epoxy or polyurethane. They’re applied in liquid form and then cure into a tough, seamless layer.
The resin settles over the tiles like a skin - grout lines included. The overall impression becomes calmer, more contemporary and often brighter. Colour options range from warm beige shades and sandy neutrals to cool concrete greys, crisp white and bold accent colours.
Where a resin floor is especially worth it
Because the surface is waterproof and hard-wearing, it suits almost every part of the home:
- Kitchen: easy to clean, with no grout lines to soak up greasy splashes
- Bathroom and guest WC: moisture-resistant, with slip-resistant finishes available
- Hallway: durable against street dirt and outdoor footwear
- Living and dining areas: a quiet, unbroken surface that helps furniture stand out
Finishes can be specified as matt, satin-matt or glossy. Matt tends to read as Scandinavian and pared-back; glossy surfaces have the feel of high-end showrooms; satin-matt sits between the two and is currently a favourite for many interior designers.
What the existing tiled floor must be like
As attractive as it sounds, the approach isn’t suitable for every old floor. The key factor is the condition of the substrate. If the base is moving or coming away, the new layer is likely to fail over time as well.
That’s why a careful inspection comes first:
- Tap-test the tiles: if a tile sounds hollow, it’s no longer properly bonded.
- Check for loose sections: any rocking tiles must be removed and replaced.
- Repair cracks and chips: damaged areas are closed with filler.
- Rule out moisture: the substrate has to be dry, otherwise blistering can occur.
"Only a stable, dry and clean tiled floor is suitable as a base - otherwise the problems simply end up trapped beneath the new layer."
Grout lines should also be cleaned and, if needed, lightly filled. The aim is a surface that’s as level and closed as possible so that dips don’t telegraph through later. On very smooth tiles, a bonding primer helps improve adhesion between the old finish and the resin.
How preparation works in practice
The groundwork is what determines both the final look and how long the floor lasts. For that reason, professionals follow a clear routine:
- Deep cleaning: remove dust, grease, soap residue and any care products thoroughly.
- Allow to dry: the floor must dry out completely before the next stage.
- Tile check: re-fix or replace any loose tiles and fill cracks.
- Treat the grout lines: skim low areas to create an even surface.
- Apply a bonding primer: use a suitable primer depending on the type of tile.
These steps may not look dramatic, but they make the difference between a floor that performs for years and one that develops issues soon after installation.
DIY or bring in a specialist?
DIY resin-floor kits are appearing more and more often in home-improvement shops. On small, uncomplicated areas, a capable DIYer can certainly achieve a good result - for example, in a guest WC or a very small kitchen.
In terms of cost, basic systems start at around €18 per square metre in materials. It’s tempting, but it demands discipline: working time is limited, air bubbles must be removed, and keeping the layer thickness even takes practice.
For larger rooms, continuous flooring from the hallway through to the living room, or bathrooms that see heavy use, many people prefer to use professionals. Depending on the system, colour choice and finish, specialist installation is more commonly in the region of €100 to €150 per square metre. That generally includes preparation, materials, application and often a final protective coat.
"If you want a perfectly smooth, almost joint-free surface without tool marks, in many cases you’re better off with a specialist contractor."
What looks you can achieve with a resin floor
The appeal isn’t only about less dirt; it’s also about design flexibility. Popular options include:
- Mineral-inspired shades: soft beige and sand tones, ideal for warm, homely rooms
- Concrete effect: cooler greys for a loft feel and minimalist interiors
- Light, solid colours: white or off-white can make small bathrooms feel bigger
- Slip-resistant textures: lightly textured finishes for showers and bathrooms to reduce slipping
If you want, you can vary the finish by zone - for instance, a slightly more grippy texture in wet areas and a smoother, satin-matt surface in living spaces. The visual language stays consistent, while the practical performance is tailored to each room.
Cleaning, durability and possible risks
Day to day, one of the biggest benefits becomes clear: there are no grout lines where dirt or limescale can build up. In most cases, a mop with a mild cleaner is enough.
Even so, a few rules apply. Abrasive cream cleaners, wire wool or very harsh chemicals can scuff and dull the surface. It’s safer to use products approved specifically for these systems. Add felt pads to furniture with hard edges to reduce the chance of scratches.
With proper preparation and correct installation, service life can be comparable to classic tiled floors. If the appearance becomes tired after many years, it can be refreshed by applying a new top coat.
One potential issue arises if moisture is rising from below or if the original tile bed is already badly compromised. In that case, blisters, delamination or cracking can occur. This is why an expert assessment is worthwhile in advance, particularly in older buildings or basement rooms.
Who benefits most from going for a seamless floor
An overlay on existing tiles is particularly well suited to anyone who:
- wants to modernise without days of demolition
- prefers a calm, continuous floor appearance
- is planning a low-maintenance bathroom or an easy-care kitchen
- wants to make sensible use of robust but dated flooring in older properties
If you value clean lines, minimal cleaning effort and a fast visual transformation, resin floors are an interesting alternative to new tiles or vinyl. A mixed approach can also work well: use the seamless finish in high-traffic zones, while keeping parquet or laminate in bedrooms.
To avoid an expensive wrong turn, it’s worth booking a sample visit. Many specialist firms can show small sample boards in different colours and gloss levels. That makes it easier to judge how your space will feel - and whether moving on from the old tile pattern is the right choice.


Comments
No comments yet. Be the first to comment!
Leave a Comment