I assumed the insulation work would be the entire plot: cosier rooms, kinder energy bills, and a quieter winter. Then the site engineer pointed out the draught paths, the ventilation points and the control settings I’d been overlooking. Once those pieces were sorted, the house started behaving properly - and the savings arrived without sticky notes stuck to every radiator.
Comfort begins before the meter
Most people expect the first change to show up on the bill. In practice, you tend to feel it physically before you see it in the figures: corners that no longer feel icy, no fussy draught sneaking along the skirting board, and walls that aren’t unpleasant to touch. As internal surface temperatures lift and become more consistent, comfort stops being a search for the warm spot. Condensation eases off. You start using the whole home evenly, rather than camping in the one room with the sunny chair.
By wrapping the building externally, you reduce heat escaping through the envelope and also slow heat getting in during summer afternoons. It’s best understood as knocking down the peaks and troughs. Your boiler or heat pump doesn’t need to switch on and off so often. Temperature swings tighten up. Energy use drops because the house is no longer working against itself.
"Insulation shines when the house works as a team: airtight shell, clean ventilation, tuned system, and no sneaky thermal bridges."
What makes insulation actually work
Whether that new “coat” genuinely pays back usually comes down to three practical checks: airtightness, ventilation and heating-system balance. Leave any one of them behind, and you lose the benefit through a different route.
Air tightness, the quiet partner
Heat doesn’t only move through walls by conduction; it also escapes by travelling with uncontrolled air movement. Typical culprits include gaps at loft hatches, sockets on external walls, older roller-shutter boxes and tired window frames. Deal with them using gaskets, tapes and airtight back boxes. It’s worth asking for a blower-door test both before and after the work. For existing homes, a sensible goal is often around 3–5 air changes per hour at 50 Pa, while many older properties begin above 8 ACH50. Each step down reduces draughts and gives the insulation a fair chance to do its job.
"Chase the leak with a smoke pencil on a windy day. If the smoke bends at a socket, that’s not a party trick. It’s your money leaving."
Ventilation without waste
Clean air is non-negotiable, but throwing windows wide can dump warm air in minutes. You can ventilate more efficiently: use brief, purposeful airing in winter, or install single-room mechanical units with heat recovery where moisture is highest. Kitchens and bathrooms are usually the first places to improve. Aim to keep indoor relative humidity roughly 40–55%. That range is kinder to lungs, timber floors and paintwork, and it helps prevent mould once the internal surfaces are warmer.
Tune the heating system
After insulating, the heating system should be taking smaller “mouthfuls”. Reduce the flow temperature. Balance the radiators. Set thermostatic radiator valves to suit how each room is used. Heat pumps need the correct heating curve and longer, steadier run times. Boilers tend to work better with lower setpoints and weather compensation. If you improve the fabric but don’t revisit the controls, it’s like driving with the handbrake on.
- Plug the obvious leaks before the cold season: loft hatches, pipe penetrations and window perimeters.
- Deal with thermal bridges at balconies, lintels and slab edges, or add targeted insulation.
- After the work, revise flow temperatures and schedules; watch performance for a week.
- Prepare for summer with shading: external blinds, shutters or even climbing plants on the sunniest elevation.
- Use small sensors to monitor humidity and CO₂, so changes are guided by evidence rather than guesswork.
Summer matters as much as winter
External insulation earns its keep again in July. It slows the afternoon heat pulse that often crests between 3 and 6 p.m. Denser materials can add thermal lag, meaning indoor peaks arrive later and at a lower temperature. Combine that with external shading and night purging, and peak room temperatures can drop by several degrees. Fans can stay off more often. Your heat pump is less likely to run during the costliest, hottest hours.
How much money are we talking about?
The figures depend on climate, wall construction and how the home was performing at the start. Many retrofit projects see 20–40% reductions in heating energy when insulation is installed alongside air sealing and control adjustments. In leaky homes, infiltration alone is frequently responsible for 15–30% of space-heating demand. Cut that down and the boiler has a much easier job.
Upfront costs vary as well. In the UK, external wall insulation commonly comes in around £90–£150 per square metre for straightforward elevations, with scaffolding and detailing as additional items. In the US, typical pricing is $12–$25 per square foot depending on the finish and any remedial work. Payback is quicker when you can combine the work with grants, or when fuel prices rise. Look at schemes such as the Great British Insulation Scheme in the UK, or state-level rebates linked to federal incentives in the US.
| Element | Quick check | Why it pays |
|---|---|---|
| Air tightness | Blower-door test; target 3–5 ACH50 after works | Reduced draughts and improved comfort at lower thermostat settings |
| Ventilation | Humidity 40–55%; boost extraction where you cook or shower | Healthier air, lower mould risk, and less heat lost through airing |
| System tuning | Lower flow temp; balance radiators; update schedules | Longer run times, fewer cycling losses, and quieter operation |
| Thermal bridges | Thermal imaging on a cold morning | Warmer corners, more stable paint and plaster, and efficiency you feel in real use |
Materials are not one-size-fits-all
Expanded polystyrene can deliver strong winter performance at a keen price. Mineral wool brings improved fire resistance and better acoustic control. Wood fibre adds density and can delay summer heat. The right choice depends on street noise, solar exposure, planning constraints and what you can spend. Any of these options can underperform if gaps remain, or if wet details develop around edges, sills and balcony slabs.
"If you can only do one thing this year, fix the leaks. If you can do two, add ventilation you can trust. Insulation then shows its true value."
What to ask before signing a quote
Strong projects are planned properly before anyone turns up with boards and mesh. Request U-value calculations, junction details and a clear method for handling corners, pipe penetrations and vents. Ask for a blower-door test to be included in the contract, not treated as an optional extra. Confirm fire breaks and fixings are appropriate for the substrate. Clarify where scaffolding ties will go and how those points will be made good afterwards. Push for a final inspection when it’s raining, not only on a bright day.
Common pitfalls to avoid
- Covering mould with paint without addressing surface temperature or ventilation.
- Insulating the wall while leaving perished seals around frames.
- Turning the boiler back to the previous settings once the work is finished.
- Missing summer shading and then blaming insulation for warmer rooms.
- Overlooking a slow gutter leak that saturates the new layer.
Small tools that make a big difference
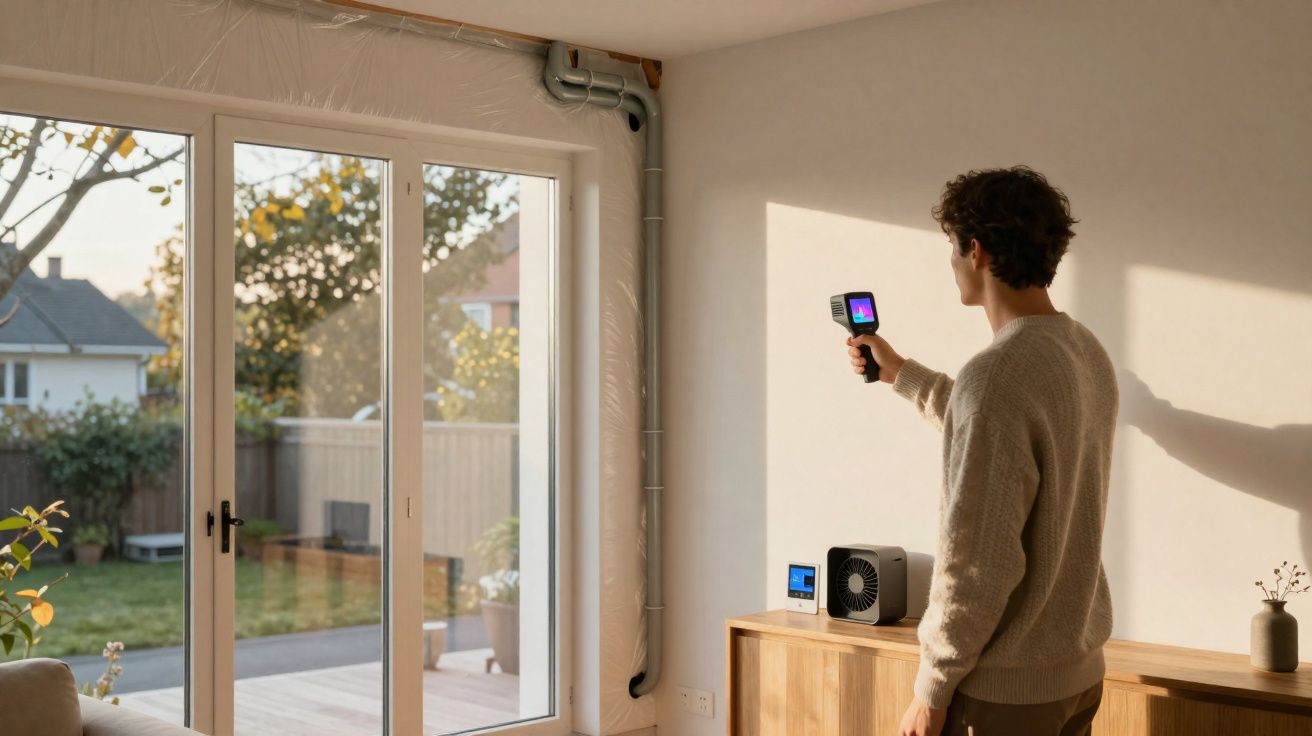
A £15 humidity sensor can teach you more about your home than a stack of manuals. A smoke pencil will reveal concealed draughts around sockets and skirtings. A smart thermostat with weather compensation - even on a boiler - can reduce fuel use once you’ve lowered the flow temperature. Thermal imaging, even if you borrow a camera for a frosty morning, quickly highlights where heat is escaping: cold patches at lintels, dark lines at slab edges, and bright spots where frames are leaking.
Extra context for planners and homeowners
For a quick reality check, sketch a basic heat-loss estimate. Take the external wall area, multiply by the current U-value, then estimate how much it falls after the insulation is added. Include an infiltration heat-loss allowance using ACH50 and convert to natural air changes with a seasonal factor. This rough approach helps you see where the biggest opportunity sits - walls, air leakage or windows - so you can spend in proportion.
A final point on moisture risk: changing the wall build-up changes the temperature profile, which shifts the dew point. Pay close attention to detailing at window reveals, sills and vent penetrations. Keep rainwater out of the new system. Maintain reliable extraction in kitchens and bathrooms. Do that, and the benefits you notice - quiet warmth and the disappearance of damp corners - should hold through this winter and the next.


Comments
No comments yet. Be the first to comment!
Leave a Comment